Subaru Crosstrek Service Manual: Dtc b19f2 short in front p/t 2 rh (to ground)
AIRBAG SYSTEM (DIAGNOSTICS) > Diagnostic Chart with Trouble Code
DTC B19F2 SHORT IN FRONT P/T 2 RH (TO GROUND)
Diagnosis start condition:
Ignition voltage is 10 V to 16 V.
DTC detecting condition:
• Lap seat belt pretensioner (RH) circuit is shorted to ground.
• Lap seat belt pretensioner (RH) is faulty.
• Lap seat belt pretensioner harness (RH) is shorted to ground.
• Airbag control module is faulty.
CAUTION:
Before performing diagnosis, refer to “CAUTION” in “General Description”. General Description > CAUTION">
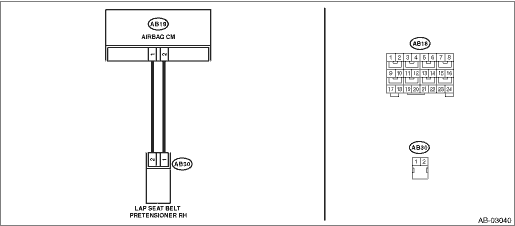
Wiring diagram:
Airbag system Airbag System > WIRING DIAGRAM">

| STEP | CHECK | YES | NO |
1.CHECK POOR CONTACT OF CONNECTORS.
Check for poor contact of the connectors between the airbag control module and the lap seat belt pretensioner (RH).
Is there poor contact?
Replace the airbag rear harness along with body harness.
Diagnostic Chart with Trouble Code > DTC B19F2 SHORT IN FRONT P/T 2 RH (TO GROUND)">Go to Step 2.
2.CHECK LAP SEAT BELT PRETENSIONER.
1) Turn the ignition switch to OFF, disconnect the battery ground cable, and wait for 60 seconds or more.
2) Disconnect the connector (AB30) from lap seat belt pretensioner (RH).
3) Connect the connector (1N) in the test harness N to the connector (AB30).
4) Connect the airbag resistor to the connector (2N) of test harness N.
5) Connect the battery ground terminal and turn the ignition switch to ON.
Does the airbag warning light illuminate for 6 seconds and go off?
Replace the lap seat belt pretensioner (RH). Front Seat Belt > REMOVAL">
Diagnostic Chart with Trouble Code > DTC B19F2 SHORT IN FRONT P/T 2 RH (TO GROUND)">Go to Step 3.
3.CHECK AIRBAG REAR HARNESS (LAP SEAT BELT PRETENSIONER HARNESS RH).
1) Turn the ignition switch to OFF, disconnect the battery ground cable, and wait for 60 seconds or more.
2) Disconnect the airbag resistor from test harness N.
3) Disconnect the connector (AB33) from curtain airbag module (RH).
4) Disconnect connector (AB24) from side airbag module (RH).
5) Disconnect the connector (AB26) from seat belt pretensioner.
6) Disconnect the connectors (AB6, AB17, AB18) from airbag control module.
7) Connect the connector (1AG) in the test harness AG to the connectors (AB6, AB17, AB18).
8) Measure the resistance between connector (3AG) in the test harness AG and chassis ground.
Connector & terminal
(3AG) No. 17 — Chassis ground:
(3AG) No. 19 — Chassis ground:
Is the resistance 1 M? or more?
Diagnostic Chart with Trouble Code > DTC B19F2 SHORT IN FRONT P/T 2 RH (TO GROUND)">Go to Step 4.
Replace the airbag rear harness along with body harness.
4.CHECK AIRBAG CONTROL MODULE.
1) Connect all connectors.
2) Clear the memory. Clear Memory Mode">
3) Perform the Inspection Mode. Inspection Mode">
4) Read the DTC. (Current malfunction) Read Diagnostic Trouble Code (DTC)">
Is DTC B19F2 displayed?
Replace the airbag control module. Airbag Control Module">
Diagnostic Chart with Trouble Code > DTC B19F2 SHORT IN FRONT P/T 2 RH (TO GROUND)">Go to Step 5.
5.CHECK FOR ANY OTHER DTC ON DISPLAY.
Is any other DTC displayed?
Check DTC using “List of Diagnostic Trouble Code (DTC)”. List of Diagnostic Trouble Code (DTC)">
Finish the diagnosis.
 Dtc u0073 control module communication bus off
AIRBAG SYSTEM (DIAGNOSTICS) > Diagnostic Chart with Trouble CodeDTC U0073 CONTROL MODULE COMMUNICATION BUS OFFDiagnosis start condition:Ignition voltage remains at 10 V or more for 1 second.DTC det ...
 Dtc b19f3 short in front p/t 2 rh (to +b)
AIRBAG SYSTEM (DIAGNOSTICS) > Diagnostic Chart with Trouble CodeDTC B19F3 SHORT IN FRONT P/T 2 RH (TO +B)Diagnosis start condition:Ignition voltage is 10 V to 16 V.DTC detecting condition:• L ...
Other materials:
Location
HVAC SYSTEM (HEATER, VENTILATOR AND A/C) > Relay and FuseLOCATIONMain fuse boxA/C relay(A)Relay & fuse boxFuse 15 A (blower motor relay)(B)Fuse 15 A (blower motor relay)(C)Fuse 7.5 A (A/C control panel, A/C relay, sub fan relay, pressure switch and blower motor relay)(D)Fuse 7.5 A (A/C contro ...
Basic procedures
WIRING SYSTEM > Basic Diagnostic ProcedureBASIC PROCEDURES1. GENERAL DESCRIPTIONThe most important purpose of diagnostics is to quickly determine which part is malfunctioning, to save time and labor.2. IDENTIFICATION OF TROUBLE SYMPTOMDetermine what the problem is based on the symptom.3. PROBABLE ...
To arm the system using access
key/remote transmitter
1. Close all windows and the moonroof (if
equipped).
2. Remove the key from the ignition
switch (models without "keyless access
with push-button start system")/turn the
push-button ignition switch to the "OFF"
position (models with "keyless access with
push-button start system").
3. Open ...
