Subaru Crosstrek Service Manual: Assembly
EXTERIOR/INTERIOR TRIM > Door Trim
ASSEMBLY
1. Bend the claws while pushing the weather strip - door INN against the door trim so that there is no gap.
CAUTION:
Beware of the direction of folding the claws.
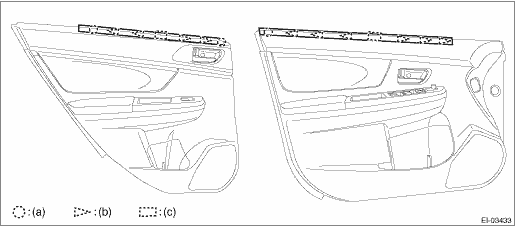
(a) | Rivet | (b) | Direction of folding claws | (c) | Claw bending direction: bend forward for LH side, backward for RH side. |
2. Install the rivet.
CAUTION:
• Set the height of rivet crimped section as 3 mm (0.12 in). If the crimp is not sufficient, press it with pliers, etc. in order not to interfere the trim panel - door.
• Apply unwoven cloth tape so that the rivet crimped section is covered. If unwoven cloth tape is not applied, a knocking noise may occur when the door panel contacts the rivet crimped section.
Preparation tool and item:
Hand riveter (corresponding to φ3.2 mm (0.13 in))
Rivet
Tape: 94029FG000/TAPE or unwoven cloth
3. After installing the weather strip - door INN, perform the following checks.
• Make sure there are no gaps between the weather strip - door INN and the door trim.
• Make sure there are no looseness when pulling the weather strip - door INN lightly.
 Door trim
...
 Removal
EXTERIOR/INTERIOR TRIM > Door TrimREMOVAL1. FRONT DOOR1. Disconnect the ground cable from battery. NOTE">2. Remove the trim panel - front door.(1) Attach the protective tape (a).(2) Open t ...
Other materials:
Removal
FRONT SUSPENSION > Front CrossmemberREMOVALCAUTION:• The power steering control module continues to operate after the engine stops and calculate the temperature in the control module. Therefore, before starting service of the power steering system which requires disconnection of the connect ...
Installation
FUEL INJECTION (FUEL SYSTEMS)(H4DO) > Fuel PumpINSTALLATION1. Install the fuel pump assembly to the fuel tank.(1) Make sure the sealing portion is free from fuel or foreign matter before installation.(2) Align the protrusion (A) of the gasket to the position shown in the figure, and install the g ...
Unlocking
Perform steps 1 to 5 described in "Registration".
NOTE
You cannot unlock by PIN Code
Access in the following cases.
when the access key is within the
operating ranges
when the ignition switch is in the
"ACC" or "ON" position
If you make an operation error
during the unlocking proced ...
