Subaru Crosstrek Service Manual: Adjustment
EXTERIOR BODY PANELS > Front Hood
ADJUSTMENT
Adjust the clearance around the hood COMPL - front as follows.
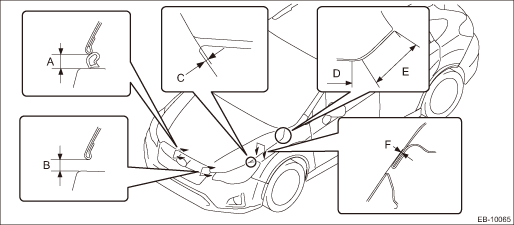
Part | Standard | |
A | Hood COMPL - front to Front grille | 7.5±1.0 mm (0.30±0.04 in) |
B | Hood COMPL - front to Bumper face - front | 6.0+2.0, −1.0 mm (0.24+0.08, −0.04 in) |
C | Offset value: Hood COMPL - front to Front end of fender COMPL - front | 0+0.5, −1.0 mm (0+0.02, −0.04 in) |
D | Hood COMPL - front to Fender COMPL - front (from front end to just before curved portion) | 3.5±1.0 mm (0.14±0.04 in) |
E | Hood COMPL - front to Fender COMPL - front (from rear end to just before curved portion) | 4.5±1.0 mm (0.18±0.04 in) |
F | Surface level gap: Hood COMPL - front to Fender COMPL - front | 0.5+0.5, −1.0 mm (0.02+0.02, −0.04 in) |
1. Adjust the horizontal position of the hood COMPL - front.
(1) Loosen the attaching nuts of the hinge COMPL - front hood on the left and right sides.
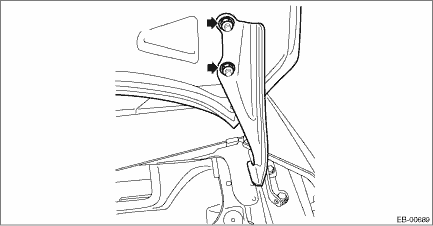
(2) Adjust the horizontal clearance of the hood COMPL - front, and tighten the attaching nuts of the hinge COMPL - front hood.
Tightening torque:
25 N·m (2.55 kgf-m, 18.4 ft-lb)
2. Adjust the front end height of the hood COMPL - front.
(1) Loosen the bolts on the lock assembly - front hood.
(2) Adjust the lock assembly - front hood by moving it up and down.
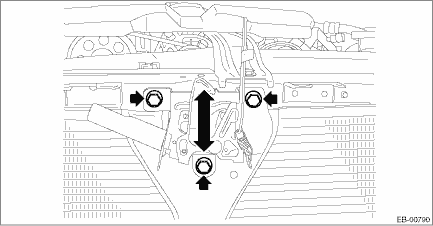
Tightening torque:
33 N·m (3.36 kgf-m, 24.3 ft-lb)
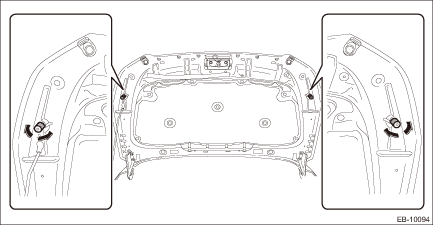
3. Rotate the buffer - front hood of the hood COMPL - front to adjust the height.
 Front hood
...
 Removal
EXTERIOR BODY PANELS > Front HoodREMOVAL1. FRONT HOOD PANELCAUTION:The hood COMPL - front is heavy. When removing or installing the hinge COMPL - front hood, be sure to work in a group of two or mo ...
Other materials:
Maximum load limits
WARNING
Never exceed the maximum load
limits explained in the following.
Exceeding the maximum load limits
could cause personal injury and/or
vehicle damage.
CAUTION
Adequate size trailer brakes are
required when the trailer and its
cargo exceed 1,000 lbs (453 kg)
total weight.
B ...
Removal
SECURITY AND LOCKS > Rear Outer HandleREMOVAL1. Raise the glass assembly - rear door to the top position.2. Disconnect the ground cable from battery. NOTE">3. Remove the trim panel - rear door. Door Trim > REMOVAL">4. Remove the sealing cover - rear door. Rear Sealing Cover ...
Assembly
REAR SUSPENSION > Rear Lateral LinkASSEMBLY1. Before assembly, inspect the following items and replace any faulty part with a new one.• Visually check the lateral link assembly - rear for damage and deformation.• Visually check the bushing for abnormal cracks, fatigue or damage.2. Usi ...
